Cadaxo UI5 Snippet 2

Cadaxo UI5 Snippets #2 – i18n with parameters in XML View

Internationalization in UI5 – using i18n properties files – is the way to translate text into other languages. In this blog post I will share you the way, how to use i18n text with parameters in XML Views.

Define i18n File

/webapp/i18n/i18n.properties

Using in XML View

To display defined text with parameters you can use following snippet

Set parameters in Controller

Define JSON Model in manifest.json file

Do not forget to define ‚myModel‘ as it is not possible to input the parameter as a hard-coded strings. Either in the View or in manifest.json file

Let me know how you work with i18n parameters in Frontend or leave a comment if you found this blog post useful!

Constants

Cadaxo UI5 Snippets #1 – How to define constants

During the work on some Freestyle UI5 Apps I always look for a way how to save constants in Frontend. I would like to share following practice with you, which I use currently.

Define JSON File with Constants

I am going to create a new File in my project root folder. In this file all constant and values will be stored as a JSON Object.

/webapp/model/constants.json


Define JSON Model in manifest.json file

I my project manifest.json, I am going to define a new JSON Model with created JSON file in URI

Using Constants in View

From now on it is possible to use the constant model in View:

Using Constants in Controller

And of course also in Controllers. For example like this:

Let me know how you save constants in Frontend or leave a comment if you found this blog post useful!

ODATA Service

Cadaxo SQL Cockpit 3.8 – OData Service Generation into Worklist

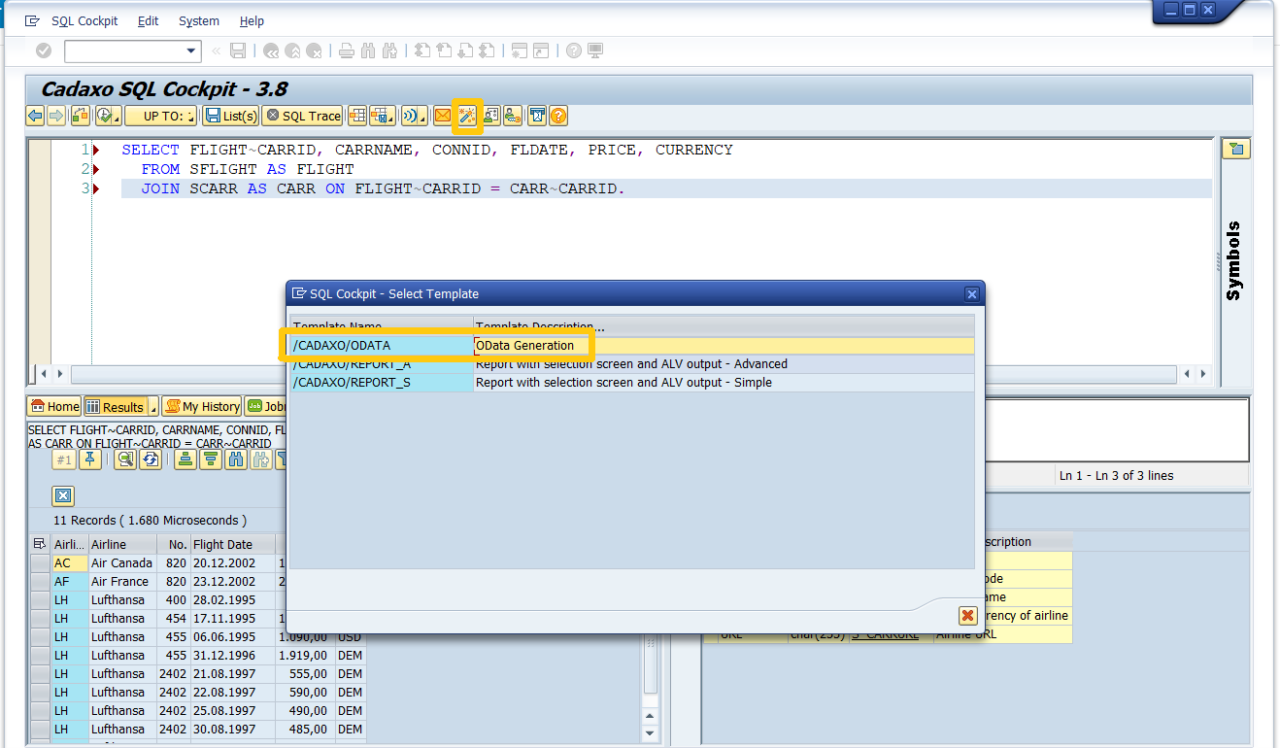
In Cadaxo SQL Cockpit Version 3.8 (Releaseinfos), it is now possible to generate an SAP® Gateway OData Service out of an ABAP Open-SQL Select Statement.

Due to the newly added /CADAXO/ODATA Template, which is from now on available in Select Template wizard, the user can generate the OData Service based on the Select Statement, which the user previously displayed in the Cockpit.

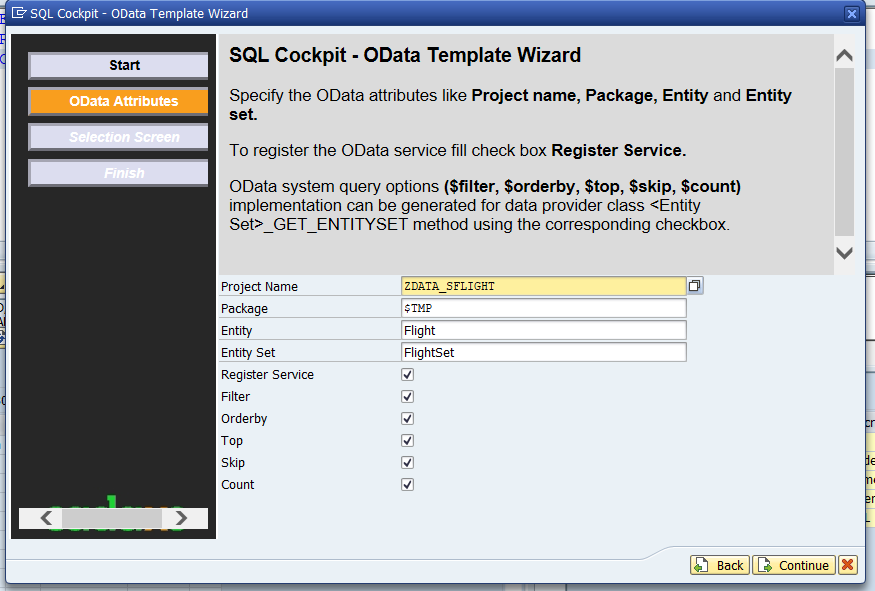
In the next steps, the User is guided through OData Template Wizard. In here some important information about the Service must be added. Like Project Name (SEGW) and name of generated Entities. Filter, Order by, Skip, Top and Count features are optional.

After all steps of the OData Template Wizard are done successfully, the OData Service is activated automatically.

Given ‚Project Name‘ can be opened in SAP Gateway Service Builder (T-Code SEGW) and generated Entity Type and Set can be extended if needed.

Lets try the generated Service in practice!

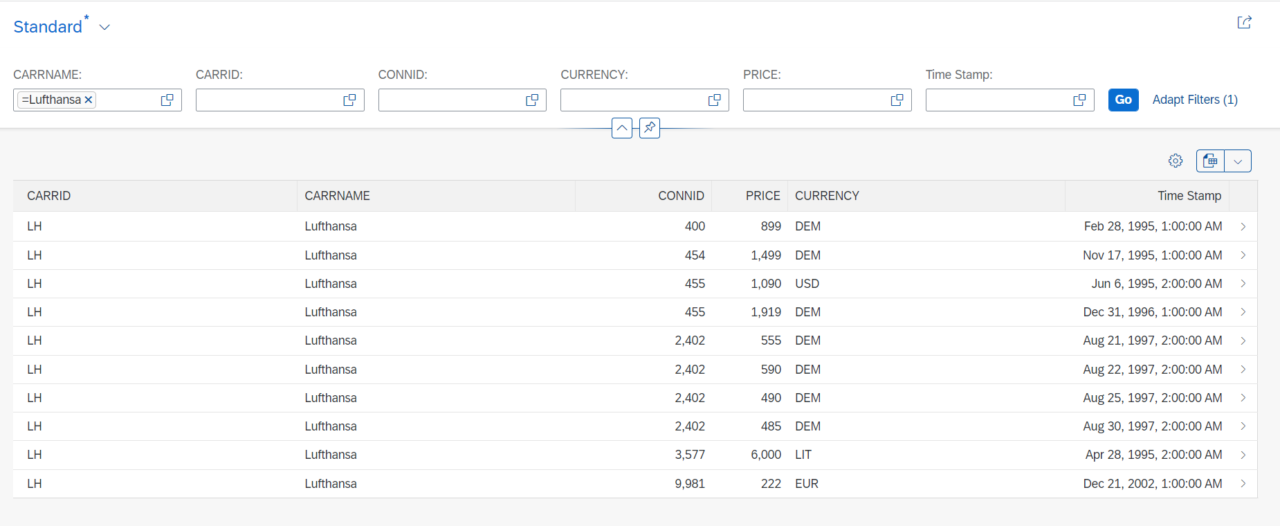
Thanks to the SAP Fiori® Tools Visual Studio Code Extension I am able to quickly generate new SAP Fiori® elements Application – Worklist.

Without any lines of code, my Service has been used as a Data source and following App has been generated. Filter options are working out-of-the box as well.

Webinar – SAP® Gateway

Vielen Dank für Ihre Teilnahme an unserem Webinar!

Unterlagen/Links zum Webinar „SAP Gateway“

Webinar Video


Nützliche Links

Beispiele und andere Themen

Büchertipps

Unsere vergangenen Webinare


7 Reasons Why You Should Use Cadaxo SQL Cockpit

You might have heard about our Cadaxo SQL Cockpit already – it is an Add-on to your SAP System. Here is an animated video which shows very nice overview about it:

In this blog post I am not going to describe every possible use case and feature of the SQL Cockpit. I think everybody needs to find the beauty of the SQL Cockpit by himself/herself. This is how I found mine.

I am professionally the youngest guy in our Cadaxo Team but I adopted the usage of SQL Cockpit super-fast. Here are my 7 reasons why you should use Cadaxo SQL Cockpit as well.

1. Writing complicated queries has never been easier

When I started with ABAP couple years ago I was sometimes going crazy with the limitations of SE16 and other transactions. Now I read data from the database almost every time by writing a simple SELECT to SQL Cockpit.

But it is not only about simple SELECTs of course. As an ABAP Developer when I run into very complicated SELECT with JOINs or WHERE conditions I simply copy the SELECT from my code to SQL Cockpit and see the results/error immediately. It saves my time with beloved debugger.

2. Generating Reports

Not only that all queries stay in History for later usage, it is also possible to generate reports out of your queries. It is really simple – there is a wizard for it. You don’t need any ABAP skills to write cool Reports very fast with select-options and everything you need.

3. Comparing Results on Site

Do you remember last time when you copied/exported data from one table to your spreadsheet, then from another table and another table… and then visually compared the results?

Well, in SQL Cockpit I just run two or more SQL statements next to each other and can compare the results with our Compare result list function, while staying on the same site. No CTRL+C, no CTRL+V, no Excel 😊

4. Modern Up-To-Date ABAP

SQL Cockpit supports Open SQL Expressions, Functions, Host Expressions, Unions… (more info here)

5. CDS Views Supported

… and yes, (one of the FAQ these days) even access to CDS Views works very well.

6. Talk about performance

As a developer, I like to think about my code before saving it. In SQL Cockpit I can see the time needed to perform my SQL statement. I can even write two SQL statements and compare its performance. (Usually the first thought – the first query – is slower 😉

7. Overall user experience and support

I must say, I really like working with SQL Cockpit. We at Cadaxo do care about User Experience, all features are just one click away.

I hope you will find your reasons soon as well!

Webinar – ABAP® Entwicklung in Eclipse & SAP® Web IDE Einführung

In diesem Webinar wurden folgende Punkte besprochen:

  • ABAP Entwicklung in Eclipse
    • Verbindung mit einem SAP Backend-System
    • Anlegen eines ABAP Reports
    • Wizards
    • Transportanbindung
    • Outline – Navigation
    • ABAP Dictionary
    • Anlegen einer ABAP Klasse
    • Muster/Pattern einfügen, Code Completion
    • Source code based
  • Einführung in SAP Web IDE
    • Kurzer Einstieg / Navigation
    • End-to-End Application Lifecycle
    • Connected technologies
    • Summery / Nützlliche Links


Unterlagen und Links zum Webinar „ABAP Entwicklung in Eclipse & SAP Web IDE Einführung“:

Gestellte Fragen

Sind die beiden Technologien (ABAP Development Tools und Web IDE) genug ausgereift für eine echte Applikationsentwicklung, oder sind sie noch eher als „Spielzeug“ zu betrachten?

Sowohl die ADT für Eclipse als auch die Web IDE sind Entwicklungstools, die in vollem Umfang verwendet werden können! Für manche Aufgaben muss sogar ein bestimmtes Tool verwendet werden, als Beispiele:

  • Core Data Services – CDS – Views können aktuell nicht im SAP GUI (SE80/SE11) bearbeitet werden, hier muss dann auf Eclipse gewechselt werden. Generell
  • SAPUI5 Applikationen in der ABAP BSP Umgebung zu erstellen wäre zwar technisch möglich – die ADT bieten aber eine Fülle von Funktionen, die einem viel Arbeit abnehmen und die Entwicklung vereinfacht und unterstützt.

Jede der IDEs hat ihre Vor- und Nachteile und spezielle Funktionen – und auch eine primäre Anwendergruppe. Wenn ich meine Arbeit mit mehreren Tools erledigen kann, nehme ich das für mich passendste…


Weitere Details in der SAP Online-Dokumentation:


Unsere nächsten Webinar-Termine:


SAP® Overview Page – Example – List Card

Introduction

An overview page is a new type of SAP Fiori App since SAPUI5 1.32 which provides a quick overview of user important data at one screen.
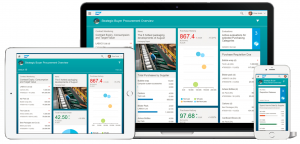
SAP Overview Pages display the data in the form of Cards.

A card is a smart component that uses UI annotation and a single entity set from an OData service to display the data. As of today (SAPUI5 1.32) there are four card types available (List, Table, Stack, Analytic) and in this blog post I will give a description how to set up a List Card.


List Cards

There are two types of List Cards – Condensed and Extended.

  • Condensed List Cards – display up to 3 data items in one row.
  • Extended List Cards – display up to 6 data items in one row.

Each type can use two types of flavor – Standard and Bar.

  • Standard Flavor – design without bar = items are numbers and texts
  • Bar Flavor – design with bar = items are combination of numbers, texts + one bar

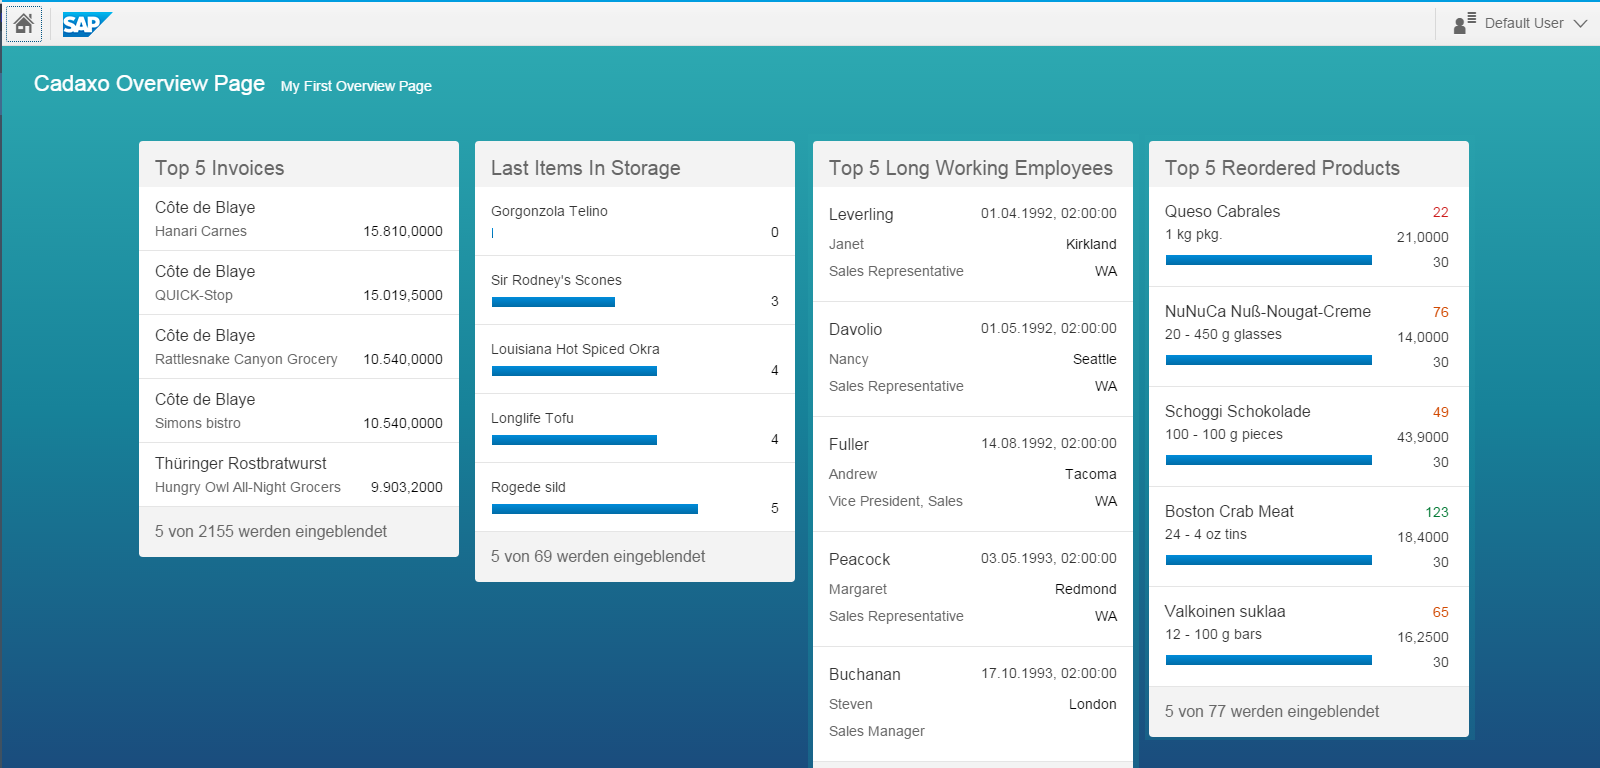
That means there are four possibilities how to display the List Cards. Take a look at following picture for better understanding of the List Cards concept.

Condensed List Card with Standard Flavor – Top 5 Invoices

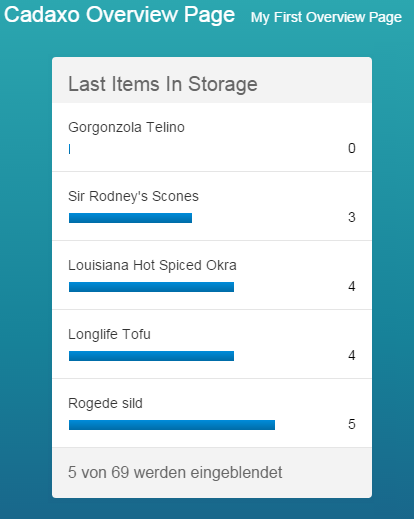
Condensed List Card with Bar Flavor – Last Items In Storage

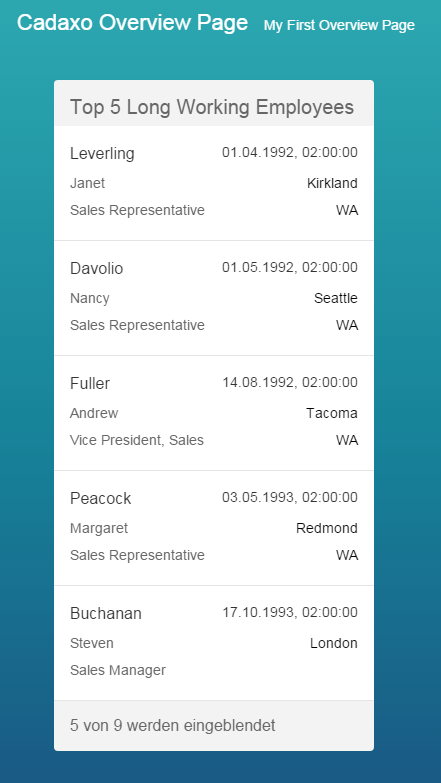
Extended List Card with Standard Flavor – Top 5 Long Working Employees

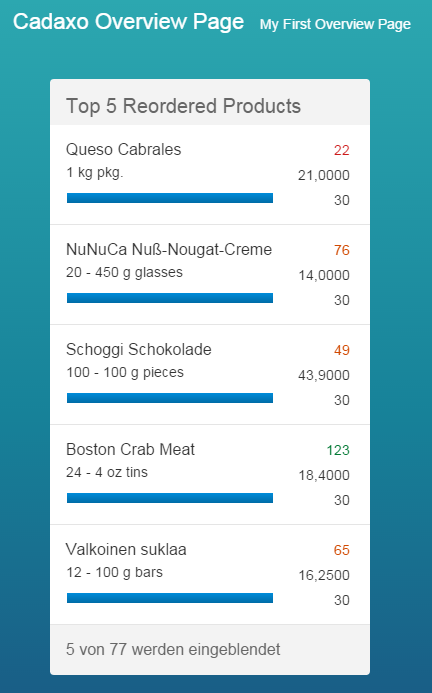
Extended List Card with Bar Flavor – Top 5 Reordered Products
overviewPage16


Prerequisities

I assume you already have an access to  (and are already a little bit familiar with) SAP WEB IDE on SAP HANA Cloud Platform Cockpit (HCP). If not, first of all I would refer you to this tutorial.

As a data source I am going to use Northwind OData service which is available for public and provides some simple data. To use this service we need to set it up in HCP Destinations.

Name: Northwind
Type: HTTP
Description: Northwind OData Service
URL: http://services.odata.org
Proxy Type: Internet
Authentication: NoAuthentication
Additional Properties
WebIDEEnabled true
WebIDESystem Northwind_Data
WebIDEUsage odata_gen

SAP WEB IDE Part

Thanks to SAP WEB IDE wizards the creation of Overview Page project is pretty straightforward. We need to create a new project from Overview Page Application Template, write name of our project, select data source – Service URL – Northwind OData Service (since our destination already contains the services.odata.org domain, we can type „V3/Northwind/Northwind.svc/“ only as the URL Part).

After project creation we can add some cards to our Overview Page. There is also a wizard for this in SAP WEB IDE – simply right click on your created project and find New -> Card. There are some customization settings in the third step – all of them are later editable from Manifest.json file.

The only tricky part about Overview Page is the creation of annotation files and Manifest. json settings (Card customization settings).

The Overview Page project in SAP WEB IDE is executed as SAP Fiori Component on Sandbox.

Condensed List Card with Standard Flavor

overviewPage19

Annotation File for Top 5 Invoices Example

  • Attribute Namespace in tag Schema must match Datasource Alias we enter during Overview Page creation
  • Attribute Target in tag Annotations must match EntityType of EntitySet we are going to use – check metadata.xml
  • Attribute Qualifier is used in Card customization settings – Manifest.json
  • We use 3 tags Record to display 3 items in one row
  • Each Record has attribute path to determine which value from Odata service are we going to display

Download XML File

Card customization settings – Manifest.json

  • last part of „annotationPath“ must match the attribute Qualifier from annotation file
  • „entitySet“ must match OData entity – check metadata.xml

Download JSON File

The other types of list cards can be created in simmilar way.

Condensed List Card with Bar Flavor
overviewPage20

Downolad Annotation File Example

Download Manifest.json Settings

Extended List Card with Standard Flavor
overviewPage18

Downolad Annotation File Example

Download Manifest.json Settings

Extended List Card with Bar Flavor
overviewPage21

Downolad Annotation File Example

Download Manifest.json Settings


Useful links

My Overview Page – Git Hub Project

SAP WEB IDE Tutorial

SAP Overview Page Official page

SAP Overview Page Official Video

help.sap.com about Cards

SAPUI5 Docu about Cards